Intro
ใน Blog ที่แล้วเราได้มีการพูดถึงเรื่อง OpenIddict, Authorization Server และ flow ของการ authorize ด้วย client credentials รวมถึงตัวอย่างการ setup project และการใช้งานในรูปแบบ client credentials ไปแล้ว
ใน blog นี้เราจะมาพูดถึง flow การ Authorized ด้วย username และ password ของ user โดยใช้ OpenIddict โดยชื่อ flow เต็มๆ จะเรียกว่า Resource Owner Password Credentials ซึ่งแต่ละที่อาจจะเรียกด้วยชื่อ อื่นๆเช่น Password Flow, Password Credentials หรือ Resource Owner Password Flow
Configuring OpenIddict
ใน Blog นี้จะแสดงให้เห็นเกี่ยวกับการ authorize ด้วย Password flow เท่านั้น ซึ่งการ set up project และ environment จะเหมือนกับตัว ClientCredentials flow
Required Dependencies:
- OpenIddict.AspNetCore
- OpenIddict.EntityFrameworkCore
- Microsoft.EntityFrameworkCore.Sqlite
- Microsoft.EntityFrameworkCore.Design
Create and configure project
สร้าง DbContext
public class ApplicationDbContext : DbContext
{
    public ApplicationDbContext(DbContextOptions<ApplicationDbContext> options) : base(options) { }
}
เพิ่ม ConnectionString ที่ appsettings.json
{
  "ConnectionStrings": {
    "DefaultConnection": "DataSource=Database\\app.db"
  }
}
เรียกใช้งาน EntityFramework ใน Program.cs
var builder = WebApplication.CreateBuilder(args);

var connectionString = builder.Configuration.GetConnectionString("DefaultConnection");
builder.Services.AddDbContext<ApplicationDbContext>(options =>
{
    // Configure Entity Framework Core to use Microsoft Sqlite.
    options.UseSqlite(connectionString);

    // Register the entity sets needed by OpenIddict.
    options.UseOpenIddict();
});

// Register the Identity services.
builder.Services.AddIdentity<IdentityUser, IdentityRole>()
    .AddEntityFrameworkStores<ApplicationDbContext>()
    .AddDefaultTokenProviders();
รัน EF Migrations command เพื่อสร้าง Database และ Table
dotnet ef migrations add init
dotnet ef database update
เรียกใช้งาน OpenIddict ใน Program.cs
builder.Services.AddOpenIddict()
    .AddCore(options =>
    {
        options.UseEntityFrameworkCore()
               .UseDbContext<ApplicationDbContext>();
    })
    .AddServer(options =>
    {
        options.SetTokenEndpointUris("/connect/token");

        options.AllowPasswordFlow();

        options.AcceptAnonymousClients();

        options.AddEphemeralEncryptionKey()
               .AddEphemeralSigningKey();

        options.UseAspNetCore()
               .EnableTokenEndpointPassthrough();
    })
    .AddValidation(options =>
    {
        options.UseLocalServer();

        options.UseAspNetCore();
    });

builder.Services.AddAuthentication().AddJwtBearer();
จะเห็นว่าใน Server options ของ OpenIddict นั้นเราแค่เรียกใช้ AllowPasswordFlow() เท่านี้เราก็สามารถใช้ password flow ได้แล้ว แต่เนื่องจาก blog นี้เขียนเกี่ยวกับ password flow อย่างเดียว ไม่มีการ integration ใดๆ กับ flow แบบอื่นๆ ซึ่งโดยปกติตัว OpenIddict เองจะถามหา client credentials ดังนั้นสิ่งที่ต้องประกาศต่อคือ AcceptAnonymousClients เพื่อให้ OpenIddict นั้นทราบว่า ไม่จำเป็นต้องใส่ client credentials เข้ามา
Configuring token endpoint
เนื่องจากตัว OpenIddict นั้นไม่ได้สนใจว่าตัว application จะมีวิธีการ authentication แบบไหน ดังนั้นสิ่งที่เราต้อง implement เพิ่มนั่นก็คือการ authentication ซึ่งจะเป็นรูปแบบ token-based authentication โดยเราต้องเพิ่ม endpoint สำหรับขอ access token จาก client โดยใน blog นี้จะใช้ ASP.NET Core Identity ในการทำ authentication ซึ่งง่ายสำหรับการจัดการ user account มากๆ สำหรับคนที่ใช้ .NET
app.MapPost("/connect/token", async (HttpContext context, SignInManager<IdentityUser> signInManager, UserManager<IdentityUser> userManager) =>
{
    var request = context.GetOpenIddictServerRequest() ?? throw new Exception("User context not found.");
    if (request.IsPasswordGrantType())
    {
        var authenticationSchemes = new List<string>
        {
            OpenIddictServerAspNetCoreDefaults.AuthenticationScheme
        };
        var user = await userManager.FindByNameAsync(request.Username);
        if (user == null)
        {
            var properties = new AuthenticationProperties(new Dictionary<string, string>()
            {
                [OpenIddictServerAspNetCoreConstants.Properties.Error] = Errors.InvalidGrant,
                [OpenIddictServerAspNetCoreConstants.Properties.ErrorDescription] = "The username/password couple is invalid.",
            });

            return Results.Forbid(properties, authenticationSchemes);
        }

        var result = await signInManager.CheckPasswordSignInAsync(user, request.Password, lockoutOnFailure: true);
        if (!result.Succeeded)
        {
            var properties = new AuthenticationProperties(new Dictionary<string, string>
            {
                [OpenIddictServerAspNetCoreConstants.Properties.Error] = Errors.InvalidGrant,
                [OpenIddictServerAspNetCoreConstants.Properties.ErrorDescription] = "The username/password couple is invalid.",
            });

            return Results.Forbid(properties, authenticationSchemes);
        }

        var identity = new ClaimsIdentity(
            authenticationType: TokenValidationParameters.DefaultAuthenticationType,
            nameType: Claims.Name,
            roleType: Claims.Role);

        identity.SetClaim(Claims.Subject, await userManager.GetUserIdAsync(user))
                .SetClaim(Claims.Email, await userManager.GetEmailAsync(user))
                .SetClaim(Claims.Name, await userManager.GetUserNameAsync(user))
                .SetClaims(Claims.Role, (await userManager.GetRolesAsync(user)).ToImmutableArray());

        identity.SetScopes(new[]
        {
            Scopes.OpenId,
            Scopes.Email,
            Scopes.Profile,
            Scopes.Roles
        }.Intersect(request.GetScopes()));

        identity.SetDestinations(GetDestinations);

        return Results.SignIn(new ClaimsPrincipal(identity), null, OpenIddictServerAspNetCoreDefaults.AuthenticationScheme);
    }

    throw new NotImplementedException("The specified grant type is not implemented.");
});

static IEnumerable<string> GetDestinations(Claim claim) => claim.Type switch
{
    Claims.Name or Claims.Email or Claims.Role => new[] { Destinations.AccessToken, Destinations.IdentityToken },
    _ => new[] { Destinations.AccessToken }
};
Seed tester account
ก่อนจะทำการทดสอบ ผมก็จะทำการสร้าง tester account ขึ้นมาก่อน โดยสั่งให้ตัว app นั้นเขียนเข้า database ก่อนที่ application จะรันขึ้นมา
var app = builder.Build();

// application pipeline implementation here

await SeedTestAccountAsync(app.Services);

async Task SeedTestAccountAsync(IServiceProvider serviceProvider)
{
    using var scope =  serviceProvider.CreateScope();

    var userManager = scope.ServiceProvider.GetRequiredService<UserManager<IdentityUser>>();
    var user = await userManager.FindByNameAsync("tester");
    if (user is null)
    {
        user = new IdentityUser { UserName = "tester" };
        await userManager.CreateAsync(user, "P@ssw0rd!");
    }
}

await app.RunAsync();
Get user token
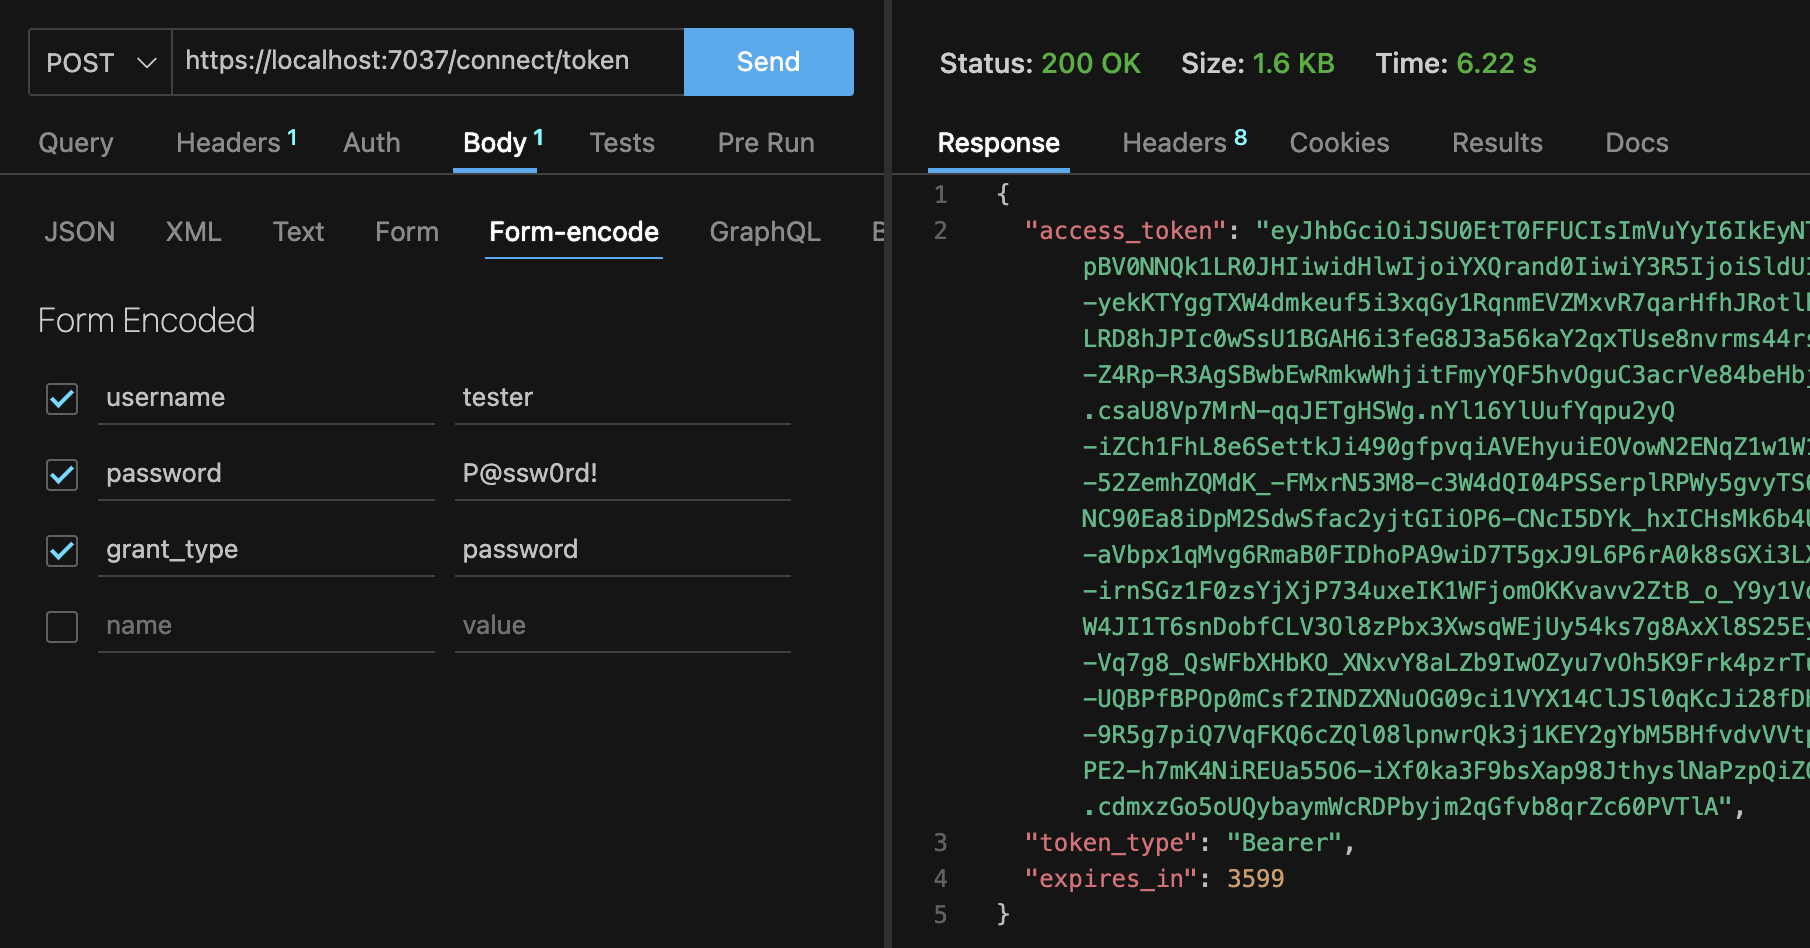
ในขั้นตอนนี้เราจะทำการ authenticate ดวก username และ password ของ tester account ที่เรา seed ข้อมูลเข้าไปยัง database โดยตัว password flow นั้นจะมี formed ในการทำ http request ดังนี้
POST /token HTTP/1.1
Host: authorization-server.com
Content-Type: application/x-www-form-urlencoded

grant_type=password&username=USERNAME&password=PASSWORD
ซึ่งผมจะยังคงใช้ Thunder client plugin for VS code ในการทำ http request เหมือนเดิม

เท่านี่ client ก็สามารถนำ access token ไปใช้งานได้แล้ว
Conclusion
จากข้างต้นจะเห็นได้ว่า Password flow ที่เป็น Standard จาก OAuth นั้นค่อนข้างคล้ายคลังกับ JwtBearer (Json Web Token) ซึ่ง token ที่ได้จากการ authorization ด้วย OpenIddict นั้นอยู่ในรูปแบบ Jwt นั่นเอง เพียงแต่ OpenIddict สามารถเพิ่มในส่วนความปลอดภัยเข้าไปได้ เช่นนำไป ใช้ร่วมกับ ClientCredentials หรือ Authorization Flow อื่นๆ ที่อยู่ในมาตราฐาน OpenID Connect หรือ OAuth
ในมุมมองการพัฒนา หากต้องการแค่การยืนยันตัวตนเพียงอย่างเดียว ไม่มีในเรื่องการตรวจสอบสิทธิ์ นั้นอาจจะไม่จำเป็นที่ต้องนำ OpenIddict มาใช้ ซึ่งใช้เพียงแค่ JwtBearer เพียงพอแล้ว และง่ายต่อการ implement มากกว่า
Pros:
- Standardization: OpenIddict ใช้เฟรมเวิร์คของ OpenID Connect ซึ่งเป็นมาตรฐานที่รับรองความถูกต้องของ OAuth 2.0 และได้รับการยอมรับโดยอุตสาหกรรมซอฟแวร์.
- Security: OpenIddict มีความปลอดภัยที่ดีกว่ามาตรฐาน OAuth 2.0 ซึ่งเน้นที่ความเป็นส่วนตัวของผู้ใช้.
- Token Management: OpenIddict ช่วยจัดการการสร้าง, การตรวจสอบ, และการส่ง tokens.
- Flexibility: OpenIddict มีความยืดหยุ่นในการปรับแต่งการกำหนดค่าเพื่อตรงตามความต้องการของเรา.
Cons:
- Complexity: OpenIddict มีความซับซ้อนมากขึ้นเมื่อเทียบกับ JwtBearer เนื่องจากมีส่วนประกอบที่มากกว่าและต้องการความเข้าใจอย่างละเอียด.
- Overhead: OpenIddict อาจมี overhead มากกว่าเมื่อเทียบกับ JwtBearer ในการจัดการ token.
- Learning Curve: ต้องใช้เวลาที่มากกว่าในการเรียนรู้และทำความเข้าใจเฟรมเวิร์ค.