Intro
ใน Blog ก่อนหน้านี้ได้มีการพูดถึง Client Credentials Flow และ Password Flow กันไปแล้ว ซึ่งทั้งสอง flows นั่นมีวิธีการในการ authorize ที่แตกต่างกัน แต่ใน blog นี้จะมาถูกถึง flow อีกตัวที่เรียกได้ว่าเป็นส่วนต่อขยายของ flow อื่นๆ นั่นก็คือ Refresh Token Flow
Refresh Token Flow ถือเป็น flow หนึ่งในการทำ Authorization โดยทำงานเอา Refresh Token ที่ได้จากการ authorized และได้มาพร้อมกับ Access Token นั้นไปขอแลกเปลี่ยนเป็น Access Token และ Refresh Token ชุดใหม่ เมื่อ Access Tokens เดิมหมดอายุ ทำให้ผู้ใช้ไม่ต้องล็อกอินด้วยการกรอก credentials ใหม่อีกรอบ
Configuring OpenIddict
OpenIddict นั้นมี Refresh Token Flow นี้ให้เราใช้อยู่แล้วโดย ซึ่งการ Configure นั่นเพียงแค่เพิ่ม server ของนั้นสามารถใช้ flow เข้าไปในส่วนของการ Configure OpenIddict Server
builder.Services.AddOpenIddict()
    .AddCore(options =>
    {
         // other core configure
    })
    .AddServer(options =>
    {
        options.SetTokenEndpointUris("/connect/token");

        options.SetRefreshTokenLifetime(TimeSpan.FromDays(1));
        options.SetAccessTokenLifetime(TimeSpan.FromDays(30));

        options.AllowPasswordFlow()
			   .AllowRefreshTokenFlow();

        // other configuration
    })
เพียงเท่านี้ตัว Authorization Server ก็สามารถใช้ Refresh token flow ได้แล้ว
Offline Access
ในส่วนการขอ Refresh Token ตาม Standard ของ OpenID Connect จำเป็นต้องมีการยินยอมให้เข้าถึงข้อมูลก่อน (accepted consent) โดยปกติแล้วถ้าใช้ Authorization Code Flow จะมีการ Redirect ไปยังหน้า Consent หลังจากทำการ Authorized ว่า Application จะขอข้อมูลอะไรจากระบบบ้าง และ User ยิมยอมหรือไม่
แต่เนื่องจาก Authorization Flow บางประเภทเช่น Password Flow ไม่ได้มี flow ในการยอมรับ consent จากทาง Authorization Server ดังนั้นการขอ Refresh Token จึงจำเป็นต้องกำหนด scope=offline_access ลงไปใน request ด้วย และทางฝั่ง Authorization Server จำเป็นต้องให้สิทธิ์ของ scopes สำหรับ "offline_access" ลงไปใน claims ของ user ด้วยเช่นกันหลังจากทำการ Sign-in เรียบร้อยแล้ว
// after sign-in succeeded

var identity = new ClaimsIdentity(
    authenticationType: TokenValidationParameters.DefaultAuthenticationType,
    nameType: Claims.Name,
    roleType: Claims.Role);

identity.SetClaim(Claims.Subject, await userManager.GetUserIdAsync(user))
        .SetClaim(Claims.Email, await userManager.GetEmailAsync(user))
        .SetClaim(Claims.Name, await userManager.GetUserNameAsync(user))
        .SetClaims(Claims.Role, (await userManager.GetRolesAsync(user)).ToImmutableArray());

// Set the list of scopes granted to the client application.
identity.SetScopes(new[]
{
        Scopes.OpenId,
        Scopes.Email,
        Scopes.Profile,
        Scopes.Roles,
        Scopes.OfflineAccess,
    }.Intersect(scopes));

identity.SetDestinations(GetDestinations);
หลังจาก Sign-in จะเป็นส่วนในการสร้าง claim identity ซึ่งจำเป็นต้องกำหนด scopes ที่อนุญาตให้ใช้งานลงไปด้วย
Request token
curl -X POST \
  'https://{your-token-endpoint}' \
  --header 'Content-Type: application/x-www-form-urlencoded' \
  --data-urlencode 'username={username}' \
  --data-urlencode 'password={password}' \
  --data-urlencode 'grant_type=password' \
  --data-urlencode 'scope=offline_access'
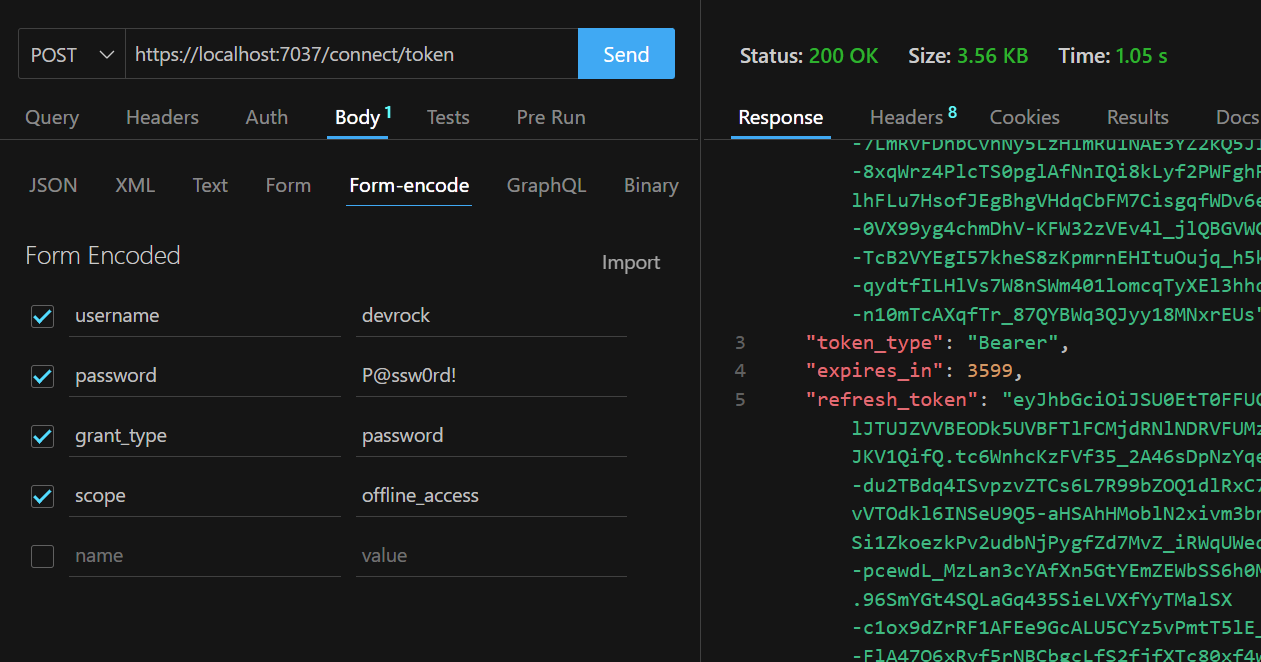
Example

จะเห็นได้ว่า Server มีการแจก refresh token มาพร้อมกับ access token
Token Endpoint for Refresh Token
หลังจากได้ Refresh Token แล้ว เพื่อให้ token endpoint ของเราสามารถแลกเปลี่ยน refresh token เป็น token ชุดใหม่ได้ ในส่วนนี้ OpenIddict จะทำ Authentication ให้ ถ้า Authentication ผ่าน ก็จะได้ Identity ของ user ออกมา (ถ้าไม่ผ่าน อาจจะเกิดจาก refresh token หมดอายุ หรือปัจจัยอื่นๆ)
app.MapPost("/connect/token", async (HttpContext context, SignInManager<IdentityUser> signInManager, UserManager<IdentityUser> userManager) =>
{
    var request = context.GetOpenIddictServerRequest() ?? throw new Exception("User context not found.");
    if (request.IsPasswordGrantType())
    {
       // handled password flow here.
    }
	else if (request.IsRefreshTokenGrantType())
    {
        var claimsPrincipal = (await context.AuthenticateAsync(OpenIddictServerAspNetCoreDefaults.AuthenticationScheme)).Principal;
        if (claimsPrincipal is not null)
        {
            return Results.SignIn(claimsPrincipal, null, OpenIddictServerAspNetCoreDefaults.AuthenticationScheme);
        }
    }

    throw new NotImplementedException("The specified grant type is not implemented.");
});
Re-issued from Refresh token
curl -X POST \
  'https://{your-token-endpoint}' \
  --header 'Content-Type: application/x-www-form-urlencoded' \
  --data-urlencode 'refresh_token={your-refresh-token}' \
  --data-urlencode 'grant_type=refresh_token'
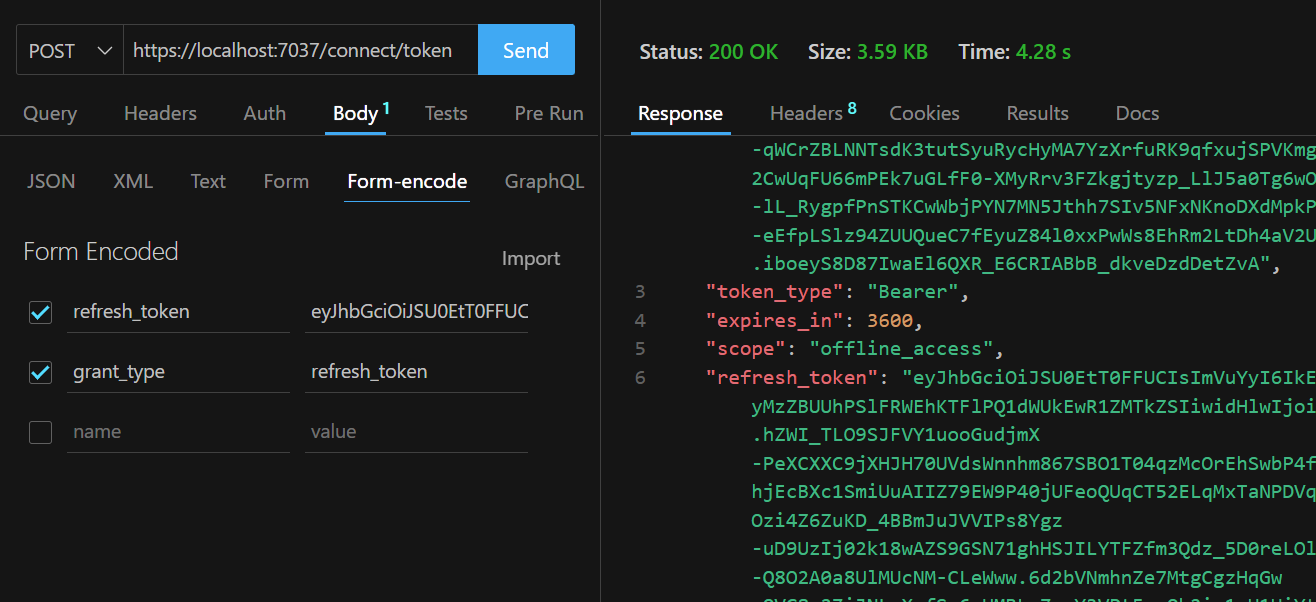
Example

จะเห็นได้ว่า refresh token ที่ส่งเข้าไปจะทำการแลกเปลี่ยนเป็น tokens ชุดใหม่ เท่านี้ก็สามารถต่ออายุให้ session ของ user อยู่ได้นานกว่าเดิมโดยไม่ต้องให้ user กรอก login credentials หลังจาก access_token หมดอายุ
Ads
ขอบคุณที่อ่านกันมาถึงตรงนี้ สำหรับคนที่อยากได้ source code ตัวอย่างสามารถเข้าไป checkout ได้ที่ Github repository
เพิ่มเติม เผื่อใครอยากติดตามผลงานสามารถ Follow Github ส่วนตัวของผม หรือจะกดปุ่มสีเหลืองๆด้านล่างเพื่อเข้าไปให้กำลังใจเป็นค่า เหล้า กาแฟสำหรับสร้างผลงานชิ้นต่อไป